Hello everyone! I am so happy that Kathy’s Crafts and Things tagged me in her post to take part in The Great Ladybug Challenge inspired by Our Little Red House. This challenge consists of creating ladybugs in whatever crafting form you choose. A big thank you to Kathy for nominating me to take part in this challenge!
So, here are the rules to the challenge:
- Thank the person/s who tagged you and create a link to their blog.
- Use “THE GREAT LADYBUG CHALLENGE!!!” logo banner on your post and copy and paste the rules on your post.
- Add a picture of your ladybug creation/s and maybe a how-to of how you did it and the supplies used.
- Create a link to Our Little Red House’s blog, so people can be inspired by her beautiful ladybugs! And check out her blog, she makes really neat projects!
- Tag 1 – 5 people that you think would be interested in making ladybugs and create links to their blogs.
- Notify your tagged people that you’ve tagged them through social media or in the comments on their blogs.
- This is a wide open ladybug making exercise! You can make them however way you want, it’s not limited to sewing them. Use whatever is your favorite crafting materials to make them. And you can even write poems or stories about ladybugs or paint pictures of them. Or make cards featuring ladybugs. Or you could even make ladybug cupcakes or cookies! Use whatever creative medium you are comfortable with!
- There is no time limit! Ladybug making should be relaxing, not stressful!
- Even if you weren’t tagged, feel free to participate in making ladybugs! Tag others and create links to their blogs so people can follow the links to see the ladybugs!

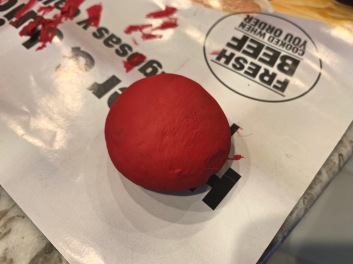
For this challenge I painted ladybug rocks similar to Kathy’s Crafts and Things. I tried coming up with other ideas, like a ladybug collage, but none of them turned out as good. My main idea was to sculpt and paint a really ornate ladybug out of clay, but sadly I’m all out of clay! Either way, doing them as rocks turned out just as great. Just look how cute they are next to my baby aloe plants!
I know, I know, my ladybug rocks aren’t the best. This was my first time painting rocks in a long time, and sadly the paint I used was pretty old and ended up cracking after it dried. I almost feel the cracked paint adds a nice touch, so I left it, but that’s just me! I’m excited to put these ladybugs outside in the spring time when it warms up. I think they will look great in my yard. Below are the steps I took to make my ladybugs.

Step 1: Paint a base coat. My boyfriend had a primer/semigloss spray paint in the garage, and I used this as my base coat. A white base coat would have probably worked better than a dark color. Either way this base coat worked great at providing a smooth, solid base.

Step 2: Next, I applied a couple coats of red paint. By doing a couple coats, all the bumps and holes were covered and the red really popped. Sadly, as I said earlier, the paint I used was pretty old and started cracking shortly after this picture.
Step 3: Now add the black markings. I used a sharpie for this because it made the application process much easier. The only thing to keep in mind is if you add another paint on top of the sharpie, such as white for the eyes, the sharpie will bleed through (I had to add a clear coat on top of the black sharpie to keep the eyes from turning purple).

Step 4: Now to paint on the face. I started by adding white dots with the back end of a paint brush so as to get perfect circles. While the white paint was out, I painted on the little mouth. After the mouth, I found a smaller paint brush to do the pupils of the eyes similar to how I did the whites of the eyes.

Step 5: All that’s left is to add a sealant to keep the paint from wearing off. I used a water resistant gloss that I use for a lot of my crafts. A matte sealant would have looked great as well.

As I said earlier, this is the first time I’ve painted rocks in a long time, and I hope they hold up well outside! I’m so glad this challenge was able to get me to try out something I haven’t done in awhile. Also, I look forward to painting more rocks in the future as I get a better hang of it. I’m very excited to put these little guys outside in the spring, and thanks again Kathy for including me in this challenge!
The fellow bloggers that I am going to include in this challenge are:
Remember, there is no time limit for the ladybug challenge, and if you’re not interested that’s okay too! I hope you all enjoy making your ladybugs, and that you’re all having a wonderful week.


Leave a comment